
What Everybody Ought to Know When Naming Your Scanned Photos – Part 1


As my scanned photo collection grows, it has become apparent to me how thankful I am for the added attention I have been putting into the filenames I give to all of my scanned images.
When scanning, it’s really easy to get into a “robotic” mindset where you are just trying to scan as many photos as possible in a sitting. So when you get to that blank field each time that asks you to type in a name for the file, it's tempting to quickly bang out a few descriptive words with little thought to how useful they will be to anyone later.
Even if you plan on only visually organizing your collection in an image manager like Apple Photos or Adobe Lightroom, you want to pay attention to this root level of identification. You will reference them more than you may think.
Filenames are “Descriptive Tattoos”
I would like you to think of the filename as a permanent “descriptive tattoo” that will always ride along and identify the origin and story of the image. It's kind of like those tiny rice-sized microchips veterinarians inject into dogs and cats to identify them in case they are found without a tagged collar. Or maybe you can think of it like when a baby is born. The baby's footprints and the parent's fingerprints are immediately pressed onto an official birth certificate, the day's date, and everyone's full name to permanently record who he or she is in this big scary world.
I think it's a surprise for people when they find out that scanning their entire photo collection is less about being a technical chore as it is a time of investigation and discovery. You start out digitizing photos you are familiar with. You know everything about them because not only are you in the photos, but you were there!
Soon you're scanning photos of your parents before they met you. They dated other people? Then you're on to their parents before they met them. Who knew cameras were around back then? You're calling them on the phone. “Who's this dancing with you?” “Where was this one taken?” “Is that your sister's first bicycle ride?” Before you know it, the pieces to your puzzle start coming together.
But time will pass and your memory will fade. And worse, 10, 20, 30 years from now, without having used a consistent and logical naming and captioning workflow, members of your family who inherited all of your hard work will have to start over – from almost the beginning!
How much will “Mom's Birthday 1.jpg” really tell someone who has never seen this photo before… or knows anyone in it?
Because of this realization, I came up with a naming formula that is not only easy but is logical. This means almost anyone can make sense of your work years from now without your physical involvement.
And not only will using it save you time and headache later when you access your master files, but with this technique, you will be able to look at a file and know exactly what scanning software and settings were used to create them. But we'll get to that later.
My naming formula is made up of 3 separate but equally important parts:

Part 1 – Add the Photo's Shoot Date
When you take a photo with your cell phone or digital camera, your image is almost always saved with some useful technical information such as the camera model, the focal length, and the f-stop used to create your photo, etc. In addition, the shoot date (the day the photo was actually taken) and time of day the photo was taken are also preserved in this (EXIF) metadata.
There's no better way of realizing how impressive this feature is than when you start scanning your non-digital photos and find out not only will you often not know the exact month and year (let alone day) these photos were taken back then, but it's ultimately your responsibility to make sure this shoot date is somehow attached to your new scan!
Your scanning software will add a date – yes. But this date is when you scanned it or you last modified it (re-saved it).
Create a Date Field in the Format of – YEAR – MONTH – DAY
It’s important when you create this date field to put the year first and not at the end. If you aren’t used to writing a date in this order, it will initially feel a little strange. This is probably because it's not how you say dates out loud. For example, we are used to saying “January first, two thousand nine” – not “two thousand nine, January first.”
The advantage of putting the year first is that no matter how many files you throw into a folder, you are guaranteed to be able to sort every single image chronologically by the shoot date.
Also, put the date field at the head of the filename. This approach is much better than putting it later because you will find being able to sort chronologically by date is far more helpful later on than only being able to sort by the first word of your description – such as “Christmas” or “Birthday.”
So for example, using the above “arbitrary” (and unrecommended) naming system, here is how 4 photos saved with the shoot date added using three different methods will be listed in a folder when the name column is sorted by their filenames:
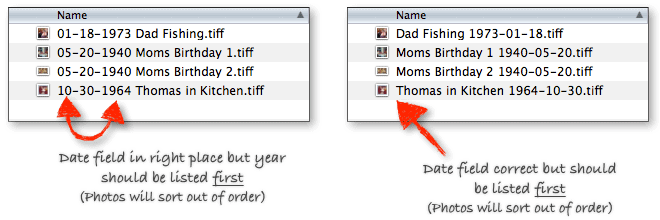

The methods in the first two examples are certainly a step up from just typing in a short description like “Grandma Sewing.” But I'm confident you will benefit more from entering them precisely, as demonstrated in the third example.
If you argue it’s better to put the date at the end of the filename because you would like to be able to sort by the event – the occasion in the photo, such as “Moms Birthday,” I would then add that this is an added benefit to putting the date at the beginning because all of your photos from one event will most likely happen on the same day or two. So not only will date first naming give you a chronological order sort, but you will also get the sort by event capability.
Add Zeros to Single Digit Numbers
Many of us aren’t used to writing extra 0s in dates – for example, when writing the date when filling out a check. We probably write “3-2-2010” or maybe even “3-2-10.” Fair enough.
But when filling in the shoot date for your photos filenames, it’s best to get into the habit of filling in these 0s for uniformity. It will make a much cleaner-looking and easier-to-read column of information.

Use x’s for Unknown Numbers
If you haven't started scanning your collection yet, and you didn't catch what I said before, let me be clearer here. More than likely, you will have a lot of photos in your collection that need to have the date the photo was taken identified anywhere on the print, negative, or slide. And worse, you may have no idea how to begin figuring them out.
Lucky for me, through the years, my Mom has written a lot of information on the back of most of our paper prints. Sometimes she wrote the entire date – month, day, and year. Other times it's “Fall 1974” or “Christmas 1975.” And then there are ones where she wrote much less, “1975” or “Easter.”
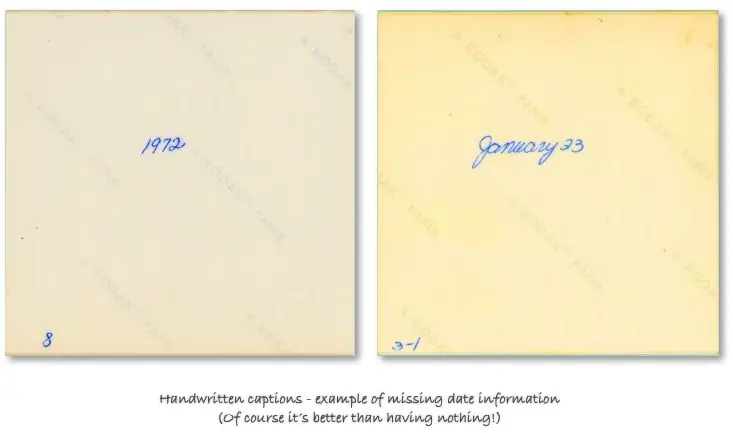
So to solve this problem, I decided to add a lowercase “x” where I wasn’t sure of a number. Doing this will allow you to sort and organize the master files as best as possible while in the “investigative phase” of this particular image. What's important is to get as much of the date into the filename as soon as possible.
When you find additional numbers later, you can always modify the filename – even if it’s being managed inside an image manager like Picasa or iPhoto.
Here is how you would deal with the various date information commonly found written on the back of your photos:
| Date Info Found | Enter This | Reason |
|---|---|---|
| Fall 1974 | 1974-xx-xx | Fall is in the later months of the year, but there is no way of knowing the month and day from just this bit of information. |
| Christmas 1975 | 1975-12-2x | You could put 25 instead of 2x, but “Christmas” could mean Christmas Eve or a couple of days around it. |
| 1975 | 1975-xx-xx | Since no month or day is listed, this is all you can enter. It's possible something in the photo itself can give you a clue. |
| Easter | 197x-xx-xx | Easter can happen anytime between March 22 and April 25th. But without knowing what year the photo was taken, there is no way of knowing which month and day. In the photo this example was taken from, I could tell I was only a few years old, so I know it was in the 1970s sometime. |
| January 1965 | 1965-01-xx | All I need to know now is what day the photo was taken. |
Don’t Guess on Numbers
This is a really important tip. If you aren’t almost 100% sure about the accuracy of a missing number, don’t guess and put a number you think is correct. Believe it or not, you will be far better off working with an “x” until you are sure you will be with a number you guessed.
Why?
You need to establish from the beginning that any information you type into the filenames of your master images is based on fact and not an assumption.
For example, if you have narrowed down a set of photos to have been taken in either July or August of a particular year, it's not in your photos' best interest to guess August until you are completely sure it's not July. If you were to type in August now and revisit this file next year, you would assume it's a fact this photo was taken in August because, more than likely, you won't remember your uncertainty.
You might allow yourself some exceptions here and there. You must decide how far you will allow yourself to stray.

For example, I have a lot of photographs in our collection from the 1960s and 70s printed on 3.5×3.5” paper with white borders around them. Often, a month and year is “burned” into the left-hand border in a nice shade of aqua blue. This isn’t the date the photo was taken. It's actually the date the paper photo was printed.
It makes sense. I mean, how would the developer have known when each photo was taken when she was only just handed a roll of film?
I usually allow myself to use this date information in my filename because I know my Mom, and she is not a patient woman when it comes to “surprises.” If I mail her a Birthday card and it arrives in her mailbox a couple of days early, it will be opened almost immediately!
And she was the same way years ago. After a big event, if there were a few unexposed frames left on the roll in her camera, she would shoot pictures of the dogs sleeping around on the carpet so she could get the film off to the developer as soon as possible! If the photo was printed with the date “May 1976,” it was most likely shot in May of 1976.
So that's it! That's all there is to add in the shoot date, which makes up “Part 1” of my naming formula.
In Part 2 of this series, I'll be going over how to describe what's actually in the photo so someone unfamiliar with it or anyone in the shot will know all about it. Also, I will explain why “Dad Fishing” or “Mom's Birthday 1” isn't an adequate description for your filename.
Loved this 3 part series!!!
Please recommend some free photo editing soft ware.
(I was directed to GIMP – but way too sophisticated for me.)
Thanks!
I’ve been adding titles to my scanned pictures by putting YYYYMMDD and that works well for those pictures that are dated. I’ve substituted “x”s in place of anything missing, such as Dec 1982 as 198212XX. I was hoping that would place the picture in the sequence of other pictures in Dec 1982, but all of the photos with “x”s in the title are grouped together. Is there any other way to title them so that they fall in the sequence with those that have the exact date?
I name my photos as ‘YYYY-MM-DD (Type) People, Event, Location’, where Type van be used to indicate T for Date Taken, E for Date Estimated, or U for Unknown, etc…. What do you think?
Very good description. This file naming convention is what I have advocated at work since 1990. One modification. For even more concise file names, I use YYMMDD instead of YYYY-MM-DD. Saves four characters in the file name. There is really no need for the century – in most cases. 450524-Topic-Subtopic.jpg may seem a little awkward at first, but with minimal training, people get used to it. It means the same as 1945-05-24. In most cases people will know the century. 1845 – George Eastman was just born and photographs were noticeably different. 2045 is not here yet. So people can be pretty sure that the image is from 1945 – with just a little thinking. The future – we are in the digital age and meta-tagging will help us confirm the century if it is in question. File name sorting? Yes, a minor shift happens once a century as it did for me in 2000.
For clarity, in the method above I use zeros, not “x’s” if there is an unknown. For instance, 450500 means I don’t know the day in May of 1945. The sort does not work right if I were to use 4505xx. The sort sees it at 4,505 not a variant of 450,500.
Bruce, I have posted this previously, but….my main consideration is: how will my successors/heirs be able to identify the photo(s) ten years after I have passed away. I have tried to make it as simple for them as possible. They probably won’t care much beyond what year, who is this, where is this, what is this. Just a thought.
John
John,
Fully understand. There are tradeoffs. I have considered this and, in fact, used to use a yyyy-mm-dd format. I offer this as an option for those exploring options. I found that typing yymmdd was much faster to type and provided a shorter filename. Man-seconds add up when you process a large number of items. I do genealogy work in my spare time – which there is not much of – so I too am sensitive to passing things along.
Having a logical and efficient system is probably the most important thing. People can figure out other people’s systems if they have one. I have had to do a lot of it myself.
Family tree maker file name displays for media items cut off at about 20 characters. Can’t see the end of the file names. YYYY-MM-DD takes up 10 characters. YYMMDD takes up 6 characters. I chose to leverage those 4 extra characters for other file content description info.
Again, as in everything, there are tradeoffs. People should do what works for them.
Thanks for the reply.
Thanks, this information will in handy when uploading thousands of pictures of my dog.
awesome! thanks
Stacy,
Here are some other sources to learn about Lightroom. Scott Kelby books are very helpful for importing and organizing photos in Lightroom, but 3/4 of the books are about editing your photos. Adobe has some free videos that might be helpful: https://helpx.adobe.com/lightroom/tutorials.html. Another one is Lynda.com. Some public libraries have subscriptions to Lynda.com, and if you are a member of the library, you can access the classes using your library card. The Lightroom CC Essential Training (2015) class looks like it would be very helpful, especially the first few sections about importing and the catalog.
One thing some first time users get confused about with Lightroom is the catalog. They think their photos are copied into the catalog when they import them. During import the catalog builds an entry for the photo that contains the file name, file path, metadata, and other information. The photos stay on your external drive. Once the photos have been imported into Lightroom it is important that any file renames or movement of photos should be done within Lightroom. If you rename the name of a photo in Lightroom, it will also rename the photo on your external hard drive, and likewise if you move a photo in Lightroom, it will move the photo on your hard drive. If you do any of these actions outside Lightroom, it will lose track of the photo. It has tools to relink to the photo, but if you don’t notice that Lightroom has lost track of a photo until months later, it could take some time to relink to it.
I hope this is of some help.
Gary
Thanks Dave. Sorry for being a pain. One more question. Since I don’t have Lightroom yet (and especially if it’s expensive and I can’t get it for a bit), if I take the time to do all the titles and people naming and tags in Windows Explorer, when/if I do get Lightroom will all that info transfer to that program or will I have to do it again?
The metadata fields are all standardized. Once you enter the data into the jpeg or tiff file, it will be available to any program that can read the metadata, including LIghtroom. The only thing that I’ve found confusing is that different software programs may refer to the the same metadata by a different name. For instance, when you enter data into the Title field using Windows Explorer, it will be displayed in the Caption field in Lightroom.
So the work you do today will carry over into the future, whatever software you end up using.
Ok now I feel like I’m doing redundancy —
Filename – 2014-03-22 – Beach
Title – 2014-03-22 – Name of Beach – people in picture (if there are any)
Tags – Beach, name of Beach
Yes?
The answer is yes and no. The information you include in the filename is helpful whenever you want to browse through a directory of filenames. It lets you quickly recognize what the picture is without having to actually view it. Starting with the date in the format you are using lets you quickly sort pictures chronologically in almost all photo viewing software.
Having the date in the Caption/Title may be somewhat redundant, but there is nothing wrong with it. Since viewing software often can display the Caption/Title when looking at the picture, it will easily let you see the date. There is a specific metadata field for the date the image was taken. This is automatically filled in with most digital cameras. If you are scanning old photos, you will need to fill this date in manually.
Tags/Keywords is a different story. If you want to retrieve photos based on specific tags, then you should place your desired tags in the tags/keywords field, separated by a semicolon. You should do this even if that information appears elsewhere. That way you know your tag searches will always be accurate. You won’t have to depend on generalized metadata searches.
Ok Dave I got lightroom. I’m trying to understand it all. So there’s a Title field and a Caption field in Lightroom. Do you use both?
Filename – 2014-03-22 – Beach
Title – 2014-03-22 – Name of Beach?
Caption: people in picture (if there are any)??
Tags – Beach, name of Beach:
Sorry I know I’m being anal I just don’t want to keep doing it over and over. It takes sooooo long
Stacy, I personally don’t enter anything into the Lightroom Title field. This doesn’t mean that you should or shouldn’t. It all depends on how you will be accessing and using this data in the future. The topic of metadata is rather complex, since the fields available have their origins from several different sources – EXIF (Exchangeable Image File Format), IPTC (International Press Telecommunications Council), and most recently
XMP (Extensible Metadata Platform). There is occasional overlap of the information contained within these various metadata fields. Let me tell you what I do to give you an example, and then you can modify it to suit your specific needs.
I rename all my photos so they at least begin with the date (1945-12-25 …). If I don’t know the date, I’ll make my best extimate for the year and add an “e” after it so I know it was an estimated year (1938e, or 1938-10e if I know the year but am not sure of the month). For old scanned photos, I’ll also include the Location (ex. Beach, Grams house), Event (ex. Jeff Graduation), and relevant people (ex. Joe Smith, Jeff’s friends) if any of these are pertinent to the photo. No need to get very specific in the file name, because you can add any details when you write the caption. My scanning software will automatically number each scan sequentially. I keep that scan number at the end of the file name. This allows me to have multiple files with the same name, as is often the case when scanning a batch of pictures. They’ll just end with a different sequence number. I do all this renaming in Windows Explorer because I find this the fastest. The primary benefit of this detailed renaming is in organizing your photos after importing them into Lightroom and also to aid anyone who receives a copy of the file. Also, I find it easiest to now change the Date Taken to a more correct value using Windows Explorer in the Details Pane. You can also do this later after importing into Lightroom (top toolbar, Metadata; Edit Capture Time…), but it takes more steps.
When I scan, I try to scan a batch of photos from the same source, such as photos that came from my Mom’s collection or photos from my wife’s Grandmother’s collection. When I import them into Lightroom, I have Lightroom automatically add the source name into the ‘Source’ field. That way I always know the origin of a particular photograph. Along the same line, I will have Lightroom automatically put my name in the IPTC Creator field and if you want to get fancy, you can include other info here, like Creator Job Title of “Scanner and archivist”. That way future generations will know who to thank for all this digitization work 🙂
Once the photos are imported into Lightroom, I will add a Caption. Here I add as much detail as I know, including the names of everyone prominent in the photo. If there was anything written on the back of the photograph, I’ll include that here as well with the notation, From Back: ” … “. I try to add whatever I think might be of interest or helpful for someone exploring their past. As a side note, it’s good to be relatively consistent here when naming things. That way when you search for a particular word or word grouping, you’re more likely to find it. For instance, I can search on “From Back” to find all the photos that had something written on their backs. The reason I use the “Caption” field is that this seems to be a fairly universally utilized field in most photo viewing apps. If you have a favorite photo viewing app that utilizes a different metadata field, such as Title for it’s display, then by all means, enter data into the Title field also.
I’m still learning and tweeking my archival methods as I go along. I haven’t mentioned anything about how I do my keywording. I have tons of pictures left to scan, as well as hundreds of slides to photograph. I’m currently using Lightroom 4, and find it to be a big help. Good luck with your project.
Thank you Dave, for taking the time out of your life to leave such detailed, helpful and “spot-on” information on this website. I couldn’t agree more with everything you’ve said.
Myself and I’m sure anyone else who will come across all of your comments are grateful! Cheers.
Thanks Dave for your great response. I too think of it like the back of the photo where i’d write everyone’s name for posterity :). So I just went into the properties of the picture (in Windows Explorer) and saw the Title area and the Tags area. Thank you for your wonderful examples of the 2. So now a couple questions come to mind:
1) If I put in the title peoples names (aka what I’d write on the back of a photograph) can I search by that. So if I want to see all pictures of Joe Smith will that come up or is the search only for the tags.
2) is there a most efficient way to change all the metadata? I have to look into that Lightroom program that everyone talks about… But right now I’ve been changing all of the “file names” as I mentioned above to “2014-09-19 – Ryan’s baseball game” and I have all events in separate folders for the most part so it’s been easier to batch rename all of the IMG2726 file names to whatever date and event they were. But even that’s been taking a looooooooong time to get through. I’m thinking to “title” and “tag” each individual picture with peoples names and keywords would take forever because I have to go into each individual pictures properties to do so. Just wondering if there’s an easier way to get to that metadata so it’s all easier to enter.
Yes, you can search the Caption/Title field. In Windows, just go to the folder that contains your photos and in the search field (top right) type in “Joe Smith” and it will bring up all the photos that contain Joe Smith in any of the fields. Of course photo management software, such as Lightroom or Zoner Photo Studio will make it easier to find specific pictures. While Windows Explorer searches all the metadata fields, these other programs let you search by any field individually and you can set up sophisticated search schemes. You can also edit your metadata more easily in these photo management programs. For instance, you can select every photo that includes Joe Smith in the picture and then add ‘Joe Smith’ to the keywords/tags for all these photos at once.
FYI, when using Windows Explorer to work with photos, it’s easiest when the Details Pane is visible on the right. If it’s not showing, just press Alt-Shift-P to display it (in Windows 8.1 at least). This will display the title and tag fields for any photo so you don’t have to go into properties to edit them.
I use Adobe Lightroom as my main photo management app. Although it’s rather expensive, it does a lot in both managing a photo collection as well as in tweeking photos to look their best. It took me a while to feel comfortable with it and I found a book by Victoria Bampton, Lightroom the missing FAQ, was very helpful in getting me up to speed. Now it feels like an old friend. I also own Zoner Photo Studio, which can do most of what Lightroom does for less money and has gotten good reviews. I never spent enough time with it to feel as comfortable as I do with Lightroom though.
What is the difference between tagging and metadata? I’m so confused. I don’t want to have to keep going over and over pictures putting in details in different places. I am putting a naming of each picture “2012-12-23 – Mom’s birthday – Joe, Bill Lastname, Michael Lastname”. I want to capture as much data as possible for future generations of who people are. But I don’t want a million peoples names in the file name (at least I don’t think I do). Then there’s the tagging. I can put these peoples names in the tagging (currently only working with Windows Explorer and Picasa – no other advanced programs). Mostly working in Windows Explorer just renaming the files and making sure the dates/titles are there. And then there’s metadata that I’m not sure about at all or where to even start with that.
Stacy, I really like the way you are naming your files – very similar to the way I do it. The nice thing about digital photos is that they can hold more within them than just pictures. Metadata is a generic term for all that additional information that can be stored digitally within the photo file. There are many different types of metadata. Digital cameras will automatically embed the camera make and model, shutter speed, lens aperture, and a whole host of other data about how the photo was taken within the picture file. This is all considered to be metadata. The people that devised the standards for jpeg files and tiff files (www.metadataworkinggroup.com) allow for very specific pieces of metadata information to be embedded within the files.
The metadata types that I find most useful when organizing my old photos are the ‘Caption’ (also known as Description in some programs, and Title in Windows Explorer) and ‘Keywords’ (also called Tags in Windows Explorer). You can think of the Caption/Title field as a free-form area where you can write about the photo. I usually include any relevant history as well as people’s names here. I like to think of it as the “back” of the picture and include whatever I normally would expect to be written on the back of a photograph. This can be as little or as much as you want. Whatever you think will be helpful to future viewers.
The Keywords/Tags field is a bit more structured. It’s main purpose is to allow easy retrieval of desired photos from a large collection. As an example, let’s say you insert the keyword ‘Dog’ for every picture that includes a dog. In the future, if you ever want to find all your pictures that have a dog in them, you just have to do a simple search for the keyword “Dog”. You can have as many different keywords as you want for any picture file, but keywords should be separated by a semicolon. Also, a keyword can contain spaces (‘Disney World’ could be used as a keyword/tag). The key (pun intended) to using keywords/tags is to plan ahead of time how you might want to search for your photos in the future and stick to a well regimented set of specific keywords. Photo management software such as Lightroom and Zoner Photo Studio do an excellent job in managing keywords. I haven’t used Picasa in a long time so I’m not sure about it’s capabilities.
One you’ve taken the time to enter your metadata (Caption/Title and Keywords/Tags) into the picture file, it becomes a permanent part of the file. If you make a copy of the file to give to someone else, the metadata goes with it so future generations will always have the benefit of your hard work.